Showing posts with label cookies. Show all posts

Monday, April 25, 2016

Caramel Chocolate Chip Cookie Pie

This delicious cookie pie is a family favorite! Grab a glass of milk, you will need it for this tasty treat!
Rachael Raves

To make this cookie stand out from your standard cookie, I added caramel filled chocolate morsels. Have y'all seen the Nestle Delightfulls? They come in lots of fun flavors and I couldn't resist the Caramel Chocolate Combo. Those two are always a winner in my book. I found the Delightfulls at Target and I know they carry them at Walmart too. Give them a try if you haven't yet. They are delicious and add something extra special to your desserts! If you aren't able to find the Delightfulls, you can always substitute your favorite chocolate chips. It will be delicious too, I promise! I've made this recipe many times before with chocolate chips and it tastes just as yummy.

This cookie pie tastes great the next day too! I'm not sure that you'll have much left though once you try the first piece! Enjoy this tasty recipe and let me know how you like it in the comments below.


Caramel Chocolate Chip Cookie Pie
Adapted from: Chocolate Treats

Ingredients
1/2 cup (1 stick) plus 1 tablespoon butter, melted, divided
1 cup packed light brown sugar
2 eggs
1/2 teaspoon vanilla extract
1 1/3 cups all-purpose flour
1 1/4 teaspoons baking powder
1 package (9 ounce) Nestle Delightfulls Caramel Filled Chocolate Morsels

Hot fudge sauce
Vanilla ice cream

1. Preheat oven to 325 degrees. Lightly grease a 9-inch pie plate.
2. In the bowl of a stand mixer, beat 1/2 cup of melted butter and brown sugar until well blended. Add eggs and vanilla. Add flour and baking powder; beat until well blended. Fold in chocolate morsels using a rubber spatula or spoon.
3. Place dough into prepared pie plate. Flatten and smooth the top and bake for 30 - 40 minutes or until toothpick inserted in center comes out clean. After removing the pie, brush the remaining 1 tablespoon of melted butter over the top of the pie. Place pie plate on wire rack to cool.
4. To serve, cute pie into wedges and top with ice cream and hot fudge sauce. 


Tuesday, June 14, 2011

Toffee Chocolate Chip Cookies

I've taken my favorite chocolate chip cookie and jazzed it up with some toffee bits! I love toffee and chocolate together, especially when it's in a cookie.  I love a yummy cookie that you can just grab off the plate when you walk through the kitchen to do something, or even one that you just walk into the kitchen to get!  You know it's a good cookie when that happens.  These cookies last exactly 1.5 days at our house, if we are lucky! We just can't resist helping ourselves to one or maybe even ten when we walk by.  This is a very simple chocolate chip cookie recipe that I use ALL the time.  I used it here, when I made my M&M Christmas cookies, and you could do the same for any holiday.  Just choose whatever colors you like and make it your own.  Or add in toffee, or mint chips, or white chocolate chips, the combinations are endless!
Toffee Chocolate Chip Cookies
1/2 cup butter, softened
1/2 cup sugar
1/4 cup firmly packed dark brown sugar
1 egg
1 teaspoon vanilla extract (please use the real thing, it makes such a difference)
1 1/2 cups flour
1/2 teaspoon baking soda
1 (6 ounce package) chocolate chips (I usually throw in a few extra for good measure, and 99% of the time I use milk chocolate ones.  You can't really have too chocolatety chocolate chip cookies can you?)
1/2 cup toffee bits

Cream butter, add sugar and beat on low until fluffy.  Add egg and vanilla; beat well. In a separate bowl, combine flour and baking soda.  Add to creamed mixture and beat well.  Stir in chocolate chips and toffee bits. Drop teaspoonfuls of the dough on a well greased cookie sheet and bake at 350 degrees for 10 to 12 minutes. Cool slightly on cookie sheet, then transfer to wire racks to cool completely.
Yields: 2-3 dozen depending on the size of your "teaspoonful"  I tend to make bigger cookies, so I always end up with less that the "yield" amount!

As always, enjoy your delicious cookies with a big glass of milk!  And make sure that you leave a plate of them out in the kitchen, you will be back for more!

Friday, December 17, 2010

Brownie Covered Oreos and Sugared Up Sugar Cookies - Final Week of 12 Weeks of Cookies!

Can you believe that we are at Week 12 already?  I can't, it seems like just a few days ago I stumbled upon this wonderful cookie linkup.  I'm so thankful that I happened upon it on Baked Bree's blog, and I'm so thankful to Abby Sweets for putting it together.  I hope that you guys have found some great recipes to share with your friends and family, I know that I have!  Since I'm working on my Christmas cookie trays a week early, I decided to go with two new recipes this week, I couldn't pick just one!
I decided to make Brownie Covered Oreos and Sugared Up Sugar Cookies.  I found the delicious Brownie treats at Picky-Palate last week.  How can you go wrong with an Oreo dunked in brownie batter.  I'll answer that for you, you can't! :)  My sugared up sugar cookies were suppose to be more of a snickerdoodle cookie, but I goofed on the cinnamon and didn't get enough on the cookies!  Isn't it funny that when you mess up a recipe, you sometimes create something better than you were intending to make?  Sometimes, other times you get a gigantic cookie mess!  Here are the recipes:
Brownie Covered Oreos
from: Picky Palate
1 Brownie mix
1 package Oreos

Preheat oven to 350 degrees F.  Prepare brownie batter according to package directions.  Leave in mixing bowl.  Dip Oreos in brownie batter then place in bottom of a muffin pan that has been generously sprayed with cooking spray.  Bake for 12-15 minutes, until brownies are cooked through.  As soon as you remove, take a plastic knife and run along edges, (this is VERY important so you get the cookie out with brownies not stuck to pan).  Let cool for 5 minutes, remove and EAT!  Enjoy! Makes entire package of Oreos

My first batch turned out more cake looking then cookie looking.  I discovered on my second batch that you don't want a whole lot of brownie batter around the cookie, it's best to shake some off before you put it in the pan.  It makes it more cookie like, less muffin/little cake like!  To us these tasted best when cooled off, if you can wait that long!
Sugared Up Sugar Cookies
1 package Sugar Cooke Mix
Granulated Sugar
Cinnamon
Red and Green Sugar Crystal Sprinkles

Prepare cookie mix according to package directions.  In a small bowl, combine sugar, red and green sugar sprinkles and cinnamon (create your own proportions, use more cinnamon if you  want it to be more snickerdoodle like, or leave it out if you want just sugar cookies).  Cook according to package directions!  Deliciously crispy and fantastic!  I know it's not really a recipe, it's a package with sprinkles and cinnamon...sorry!  Just wanted to share though, because I thought they turned out really great.  And I love rolling the cookies in the colored sugar crystals rather than just sprinkling them on top - you get sprinkles on the top and bottom of the cookie and the sides! :)

Thanks for joining us along this 12 week journey.  I've discovered some really great blogs along the way and I can't wait to see what every one has in store for the new year!  Merry Christmas to each and every one of you.  May the Joy and Hope of Christmas remain in your heart throughout the coming year!


Week 12 Twelve Weeks of Christmas:

Thursday, December 9, 2010

Chocolate Chip Cookies - Week 11 of 12 Weeks of Christmas Cookies

I've decided to go with a classic this week - Chocolate Chip Cookies.  I've been making this exact recipe for quite a while now.  I remember in college I had a Monday evening class, and I would always make a batch of these cookies to take with me.  My friends and I would sit in the back row eating these cookies and doing crossword puzzles.  Needless to say, we didn't get a whole lot out of the class.  One thing that I did learn is that everyone loves these cookies!  To give the cookies a Christmas look I added some red and green M&M's to the mix - so festive!
Chocolate Chip Cookies
from: Chocolate Fantasies by Southern Living
1/2 cup butter, softened
1/2 cup sugar
1/4 cup firmly packed dark brown sugar
1 egg
1 teaspoon vanilla extract
1 1/2 cups all purpose flour
1/2 teaspoon baking soda
1/4 teaspoon salt
1 (6 ounce) package semisweet chocolate morsels
1/2 cup or more colorful M&M's

Cream butter; gradually add sugar, beating at low speed of an electric mixer until light and fluffy.  Add egg and vanilla; beat well.  Combine flour, soda, and salt; add to creamed mixture, beating well.  Stir in chocolate morsels and M&M's.  Using a cookie scoop, drop onto ungreased cookie sheets.  Bake at 350 degrees for 10-12 minutes.  Cool for a few minutes on cookie sheet; transfer to wire racks to cool completely.  Yields: 2 to 2 1/2 dozen cookies

I love this cookie.  It's my favorite go-to cookie when I'm in a pinch.  I always have the ingredients on hand to quickly throw some in the oven.  I made this cookie a lot in college - especially when I was having a rough day.  Make some today and share them with a friend, you'll brighten their day! :)
Week 11 Twelve Weeks of Christmas:


Thursday, December 2, 2010

Chocolate and Peanut Butter Sandwich Cookies - Week 10 of 12 Weeks of Christmas Cookies

Raise your hand if you like chocolate and peanut butter.  That's what I thought, most of you do!  I was lurking around Pioneer Woman's site in honor of cookie week and happened upon these delights.  They are a creamy, oh so delicious peanut butter filling sandwiched between two chocolate cookies.  What's not to love?
The cookies are so quick to make, they take a little help from a box of cake mix.  The cook time for the cookies is only 10 minutes and the filling comes together in a snap.  If you are looking for a tasty treat to make at the last minute, add these to your list!
Chocolate Peanut Butter Sandwich Cookies
from: The Tasty Kitchen
Ingredients:
COOKIE:
2 Eggs
½ cup Vegetable Oil
¼ cup All-purpose Flour
1 box Devil's Food Cake Mix
Filling:
4 ounces Cream Cheese, softened
¾ cup Smooth Peanut Butter
1 teaspoon Pure Vanilla Extract
2-½ cups Powdered Sugar
3 Tablespoons Milk

For the cookies:
Preheat oven to 350ºF. Lightly whisk eggs and oil in a medium bowl. Mix in flour and cake mix until well blended. Roll into 1 inch balls and bake for 8-10 minutes on an ungreased cookie sheet. Cool completely on a wire rack.
For the filling:
In a bowl cream together cream cheese, peanut butter and vanilla. Add in powdered sugar and mix until smooth. Add in milk a little at a time until you get the desired consistency.
Spread about 2 Tablespoons of frosting onto the bottom of one cookie and then place another cookie on top.  Repeat with remaining cookies.  Enjoy!

The next time that I make these (oh there will so be a next time, maybe as soon as this batch is gone and maybe with a mint filling), I will flatten the cookies a little before they go in the oven.  I like to use a cookie scoop, but sometimes cookies retain too much of that ball shape and don't flatten out.  That happened here, so my sandwich cookies looked a little more round than they should have.  They still tasted great though and that counts for something.
The recipe says it makes 16 servings, but we all know that I never get that many.  I was able to get about 14 sandwiches and a lot of leftover filling.  I'm thinking of making a batch of brownies and putting the filling on top and then a layer of melted chocolate over that.  Does that sound fantastic or what?  Stay tuned for that experiment!
Oh and make sure you have a big glass of milk nearby, these cookies require it!

Can you believe we only have two more weeks of cookie posts?  That means Christmas is right around the corner, hooray!
Week 10 Twelve Weeks of Christmas:

Friday, November 26, 2010

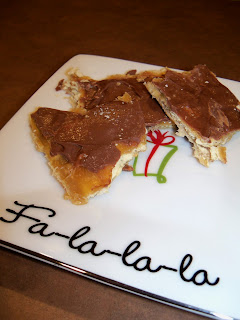
Toffee - Week 9 of 12 Weeks of Christmas Cookies!

 I hope that each and every one of you had a fantastic Thanksgiving.  I know we did...I'm still feeling full from all of the delicious food we ate.  I'm finally getting around to my cookie post for the day.  We've been having so much fun decorating for Christmas that I haven't gotten around to it...until now.  I made toffee this week to share for our Thanksgiving dinner, but we had so much food that we barely ate it!  :)  It's super easy and fun to make.  The recipe says to use foil, but next time I would probably try something different.  The toffee stuck to the foil pretty bad and I had to use some strong forces to get it off!  Maybe parchment paper or a silicone mat would work better. 
Toffee
adapted from: Cooks
40 saltine crackers
1 c. butter
1 c. brown sugar
1 c. milk chocolate chips
Arrange 40 saltine crackers on foil on a jelly roll pan. Melt butter and brown sugar in pan and boil 3 minutes. Pour over crackers. Bake for 5 minutes in preheated oven at 325 degrees. Pour chocolate chips over and let stand 5 minutes to melt. Spread around with knife. Place in refrigerator until hard. Break up into bite-size pieces. Yum!

This would look great on any holiday cookie tray!  I can't wait to see what every one else is baking this week for the 12 Weeks of Christmas Cookies!  Christmas Season has officially begun - time to pack up the pumpkins and pull out the trees, angels, Santa's, nativities, and stockings!  Our house is starting to feel like Christmas!
Week 9 Twelve Weeks of Christmas:

Friday, November 12, 2010

Andes Mint Cake Balls - Week 7 of 12 Weeks of Cookies!


Oh.my.goodness!  I am in love with this chocolate and mint delight!  I'm surprised there were any left to take a photo of after I sampled the first few.  OK, the first six!  Lucky for you guys this recipe makes a lot, so there's enough for you to eat and for you to share with friends (if you want, I won't tell if you don't).  I love making cake balls.  They remind me of little petit fours without all the work.  Don't get me wrong, you will have to do a little work but not much!  It's a delicious little cake covered in chocolate, how could that go wrong?  It can't!  So let's get to the recipe!
Andes Mint Cake Balls
Method: Bakerella
Chocolate and Mint Combo - came to me at 3:00 in the morning, I'm sure!

Ingredients:
1 package Chocolate Cake Mix (your favorite)
1 tub of chocolate frosting
2 packages of Andes Creme de Menthe Baking Chips

Directions:
Cook cake according to package directions in a 13x9 pan.  Let cool completely (don't try to skip ahead, you'll regret the mess).  Crumble cake into a large bowl.  Stir in one tub of frosting...yes the whole thing.  Some people only use 1/2 a tub, but the secret to moist cake balls is the amount of frosting!  Make sure the mixture is thoroughly combined, don't be afraid to get your hands dirty!  Using a small cookie scoop, scoop out cake balls onto a parchment paper lined tray that will fit in your freezer.  You will probably need 2 or 3.  Once complete, place the cake balls in your freezer for at least an hour, longer if you have the time.  Remove a tray from the freezer and working in small batches (think 1/3 cup) melt the Andes chips in a microwave safe bowl for 20-30 seconds.  Stir to create a nice smooth chocolate, then begin by dipping one cake ball at a time into the chocolate.  Cover completely, then remove with a spoon.  Place on parchment paper to cool.  Keep working in small batches until you have 5 to 6 dozen tasty treats!  I like to store these in the refrigerator, there's something about a cake ball being cold!  It just seems right!

That's it!  Easy as...well cake balls of course!  It will seem a little time consuming having to wait between each step, but it will be well worth the wait.  There's just enough mint in each of these to balance out the delicious chocolate goodness!  One bite and you will be hooked.  And remember it's just a method so you can choose whatever cake flavor and frosting flavor you like!  The cake ball world is at your fingertips my friends!  I'm off to polish off the other 5 dozen now, I might need professional help!

I have to add a shameless plug here: Did you check out my Giveaway Post?  You don't want to miss it!

Don't forget to hop on over to the other baker's blogs this week!  It's hard to believe that we are 7 weeks into this project.  That means Christmas is just around the corner.
Week 7 Twelve Weeks of Christmas:

Friday, November 5, 2010

Hot Chocolate Mocha Cookies - Week 6 of 12 Weeks of Cookies!

Wow...Friday snuck up on me this week!  It's time for a cookie post already...oh my!  Last night I got to work in my kitchen trying to whip up a batch of chocolate mocha cookies.  Getting all of the ingredients out, I realized that I am out of coffee.  We are not coffee drinkers in our house, I love the smell, not the taste.  I used to have those little Folgers packets that look like tea bags, but I ran out.  (I'm sure those taste icky to people who actually drink coffee, but for cookies they work).  Anyway, I realized that I was out and had to figure out a solution.  I searched my pantry and spice cabinet and came across my Ghirardelli Chocolate Mocha Hot Chocolate, and that's what I used!  Here's the lineup:
 Start by melting 1/2 stick of butter.  Mix in one box of devil's food cake mix, one egg, and 1/3 cup of brewed hot chocolate.  Once combined, mix in one cup of milk chocolate chips and 1/4 cup of white chips.  Using a cookie scoop drop onto your cookie sheet like so:
Yum!  Bake for 10-12 minutes at 350 degrees or until they are soft in the center and crispier on the edges.  Let them cool for a few minutes on the cookie sheet then transfer to a wire rack to finish cooling.  Serve them up with a tall glass of milk, don't resist when you want to help yourself to more!
These cookies are so soft and chewy!  I just love the texture of cake mix cookies!  Adding the hot chocolate gave these cookies a nice taste, just a little hint of mocha.  Not too overpowering, just a taste!  I love a cookie with lots of chocolate chips in it, and the mixture of white and milk chocolate is oh so yummy!  You and your guests will love these.  Make a batch ahead of time and you can store them in the freezer.  Pull them out the day before you need them and let them thaw on the counter...it couldn't be simpler.  I don't know about you guys, but I'm always looking for time savers, especially around the holidays!  I can't believe Christmas is sneaking up so fast!  Are you ready for the holidays?  Have you done your shopping and made you holiday menus?

Don't forget to check out the other cookie bakers blogs this week.  I'm still making a list of all those fantastic cookies I want to bake and give away!
Week 6 Twelve Weeks of Christmas:

Friday, October 29, 2010

Picky-Palate's Double Pumpkin Kissed Chocolate Chunk Cookies - Week 5 of 12 Weeks of Christmas Cookies

When I happened upon this recipe over at Picky Palate I knew they were my next cookie!  Oh my goodness...pumpkin, chocolate chips, and pumpkin spice Hershey kisses.  Have you heard of these?  I hadn't, so I went out on a hunt for them.  After much searching, I finally found them on and end cap at Target.  They are quite interesting.  I'm not so certain that I would just unwrap one to snack on like a regular Hershey kiss, but in this cookie they are delightful!
This cookie has more of a muffin/cake consistency than a cookie consistency.  I made them in my muffin top pan per the suggested cooking method and they turned out great.  They were all perfectly round and cute, unlike some of my other cookies I've made recently.  I don't want to rehash bad memories, so I won't go into it here! :)  I think I may have filled them a little too full.  The recipe yields 24 muffin top sized cookies, but somehow I only ended up with 16, and no I didn't eat the other 8!  We love these cookies.  They are perfect for the fall and would be equally perfect for a Christmas gift!  Who doesn't love pumpkin and chocolate chips together?

Here's the recipe!  Stop by and check out all the other great recipes Jenny has at the Picky-Palate.  She is on a Pumpkin streak, so if you need Pumpkin recipes she's got you covered.

This is part of the 12 weeks of Christmas Cookies Link-up!  Don't forget to check out what everyone else is baking this week!
Week 5 Twelve Weeks of Christmas:

Thursday, October 7, 2010

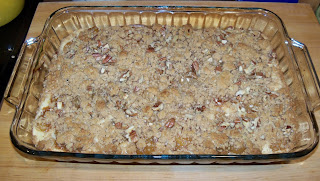
Apple Streusel Cheesecake Bars- Week 2 of 12 Weeks of Christmas Cookies

It's time for Week 2 of the Christmas Cookies!  I can't wait to see what everyone else has in store this week.  I chose to make Apple Streusel Cheesecake Bars from my Betty Crocker Fall Baking 2009 book.  You can also find it here.
Wow!  That's all I can say about this delicious treat.  Okay, so that's not all I can say, but it's the first thing I said!  As these were baking, the whole house had the scent of fall!  As soon as they came out of the oven, I wanted to get a fork and dive in...instead I waited patiently as called for in the recipe. 

You need to make these...today!  And for every fall gathering that you may possibly have on your calendar.  Seriously...you won't regret it.  I can't guarantee that these bars will last past the first few hours!  They remind me of my favorite Cheesecake Factory cheesecake flavor: Dutch Apple Caramel Struesel.  Mmm...now I can have something similar at home anytime I want.  So let's get started:

Apple Streusel Cheesecake Bars

1 pouch oatmeal cookie mix (I used Betty Crocker brand)
1/2 cup cold butter
2 packages of cream cheese (8 oz. each), softened
1/2 cup sugar
2 tablespoons flour
1 teaspoon vanilla
1 egg
1 can apple pie filling
1/2 teaspoon ground cinnamon
1/4 cup chopped pecans or walnuts

Heat oven to 350 degrees.  Spray 13x9-inch pan with cooking spray.  Place cookie mix in large bowl, cut in butter until it resembles coarse crumbs (with pastry blender or pulling 2 knives through mixture in opposite direction).  Reserve 1&1/2 cups crumb mixture, press remaining crumbs in bottom of pan.  Bake for 10 minutes.  Meanwhile, in large bowl, beat cream cheese, sugar, flour, vanilla and egg with electric mixer on medium speed until smooth.
Spread cream cheese mixture evenly over partially baked crust.  In medium bowl, mix pie filling and cinnamon.  Spoon evenly over cream cheese mixture.  Sprinkle reserved crumbs over top.  Sprinkle with pecans.
Bake 35-40 minutes or until light golden brown. Cool about 30 minutes.  Refrigerate to chill, about 2 hours.  Cut into 6 rows by 4 rows.  Cover and refrigerate any remaining bars.

I don't own a pastry blender (if I did, it would look like this in Blue Willow or Buttercup...hint, hint) so I had to resort to the two knives method which was not fun!  I must admit that I gave up on that method and crumbled it with my hands!  Much faster.  Also, the original recipe called for walnuts, but I happened to have pecans in the freezer so I used those.  They didn't really do a lot for the bars in my opinion.  I think you need a lot more of them to get a good pecan flavor, otherwise I would just leave them off next time.
They were a winner all the way around the table tonight.  C said they might be one of the best things I've made lately.  He has already flipped through this book and marked a few for the fall cooking lineup.  I can't wait to try the rest of them.  Little Man kept saying more, more!  I think we are creating a miniature cookie monster...like father, like son!
I hope your family loves it as much as mine does!
Week 2 Twelve Weeks of Christmas:

Monday, October 4, 2010

12 Weeks of Christmas Cookies!

I have decided to join in on a 12 week Christmas cookie bake coordinated by April over at AbbySweets.  Every Friday I will post a new cookie recipe for you to try out...and so will another 40+ bloggers.  Check out the pictures and links below each weeks post to see what everyone else is baking!  I'm so excited to participate.  This is my first time to do anything like it, so I hope I can keep up.  A cookie a week shouldn't be too hard, it's just the planning ahead that might trip me up!  Although I have lots of recipes to choose from, so it shouldn't be too hard finding enough.  Don't you think?

And that's not even the tip of the iceberg when it comes to my cookbooks (I might have a cookbook problem)!
I was a little late getting in on the first week, so I just linked up my Chocolate Peanut Butter Cookies that I posted a few weeks back.  Don't be worried though, you will get 11 new recipes from me starting this Friday!  I'm so excited to share them with you.  Check back on Fridays to see what I and the other bloggers are baking!
Week 1 Twelve Weeks of Christmas:

Sunday, September 26, 2010

Oatmeal Scotchies


Lucky you, I have another cookie recipe to share with you.  These Nestle Oatmeal Scotchies are fantastic.  You can get the recipe here.  These aren't your standard cookies...no way!  The oatmeal in the cookies gives them such a unique texture and taste.  Add to that the butterscotch chips and you can't go wrong.  During baking, these cookies get a nice crispness to them and the brown sugar in the recipe crystallizes nicely around the edges.  I love making these along with my standard chocolate cookie recipes.  You would be surprised how many people don't like chocolate.  Wait...did I just say that!  Yep, they are a few people in this world who don't like chocolate, none in my family of course!  So as an alternative for those people...I make these.  Of course, people who like chocolate can eat these too!
Little Man loved these.  Every time he saw the container they were stored in, he would point and say cookie.  I didn't mind giving him one at a time...the oatmeal adds some nutritional value right?  Needless to say, like most batches of cookies in our house, these didn't survive for long!

Sunday, September 19, 2010

Chocolate Peanut Butter Cookies


So if you haven't noticed we have a "sweets" problem in our house.  I love trying out new recipes and I've always got a willing taste tester, sometimes two.  I cranked out quite a few dozen cookies last weekend for our church's service project and managed to end up with a few to munch on.  Our favorite recipe of the weekend was this one that I had tucked away from an old HEB advertisement.  It's meant to have mint chocolate chips, but I substituted Peanut Butter chips...a mighty fine substitution if I don't say so myself.

Double Chocolate Cookies
Recipe from HEB Ad from sometime in the 2000's :)

1 cup flour
1/2 cup cocoa powder
1/2 tsp. baking soda
1/4 tsp. salt
1 cup sugar
1 egg
1 tsp. vanilla extract
1 2/3 cup (10 oz.) chips (peanut butter, mint, chocolate, whatever you like)
2/3 cup butter, softened

Heat oven to 350 degrees.  Sift the flour, cocoa powder, baking soda and salt together in a large bowl and set aside.  Beat the butter and sugar in a large bowl with an electric mixer on high until creamy.  Add the egg and vanilla and continue to mix on high for one minute more.  Using the mixer, gradually add the flour-cocoa mixture, 1/4 cup at a time, to the butter mixture until a smooth batter is formed.  Stir in the chips using a spoon.  Drop the cookie dough, 1 rounded teaspoon at a time, 2 inches apart on an ungreased cookie sheet.  Bake cookies 8-9 minutes.  Do not overbake.  Cool slightly; remove from cookie sheet and place on wire rack to cool completely.
Makes about 2 1/2 dozen

These cookies turn out so moist and chewy!  I love the chocolate flavor, and mixing it with the peanut butter chips is like cookie perfection!  You'll want to finish the whole batch in the first day, luckily I bagged up the give away cookies before the cookie monsters could get into them!

And as a very icky, very stupid side note....please, please, please crack your eggs in a separate bowl instead of directly into your batter.  I know this rule, my momma told me that every time I baked anything and yet I fail to heed her advice.  For the second time in my life I came across a "bad" egg that ruined a perfectly good batch of cookies!  I think I may have finally learned my lesson!  At least I hope!

LinkWithin

Related Posts with Thumbnails