Funny name? Yes it is! Does the taste make up for it? Absolutely! Pizzagna is Rachael Ray's cross between Pizza and Lasagna! You get the home-cooked flavor of lasagna in just 30 minutes, with the flavors of your favorite pizza added right in! We love pizzagna and haven't made it in quite some time. I'm not quite sure how this dropped out of the dinner rotation, just an oversight on my part I guess. I think it has been over a year since I made it, for shame! I made it last week and it was better than we remembered. We were so anxious to dig right into it that I forgot to take the picture. :)
It is so simple to make, you basically saute your veggies and cook your pasta. Layer it all in a dish with the cheesy ricotta mixture and throw it in the oven to brown on top. We like to add a lot of crushed red pepper on top of ours to give it a little kick, but you might want to avoid it. It's your call. I left one section without it so that Little Man wouldn't get too much spice. I should also add that he loved it. We've had a hard time getting him to eat pasta or mac and cheese, but he loved this. He even had some the next day for lunch. That's one of the great things about this recipe, if you use her measurements you are going to have a ton of leftovers!
Enjoy!

Thursday, September 30, 2010
The Shabby Shoppe Sale
Head on over to The Shabby Shoppe today and you will find yourself in digital scrapbook wonderland. They are having a 25% off sale for almost every item in the store. I have been wanting to purchase a few of the kits, but just hadn't taken the time to sit down and order and download them yet. Well I'm glad I "waited"...because I just got everything I wanted and more at a 25% discount. And those who know me know I can't resist a good sale! The last file just finished downloading and I must say that I am in love with the kits I bought. I decided on Bounce, Smarshmallows, and Sandbox just to name a few! I can not wait to use this on some new layouts and can't wait to share them with you! If you still aren't certain that you are ready for digital scrapbooking and don't want to commit any money to it yet, check out their free kits here. I've downloaded just about everyone of these and LOVE them! You will too!
The Shoppe sale ends on October 4, so hurry and check it out!
The Shoppe sale ends on October 4, so hurry and check it out!
Monday, September 27, 2010
Chocolate Chip Cookie Dough Cupcakes
Wow...Amanda over at KevinandAmanda.com has outdone herself today! She made some fantastic looking chocolate chip cookie dough cupcakes. Hurry, click here to see these amazing creations. I guess I know what's next on my list of cupcake experiments. Can't wait to try them out...maybe this week! Oh how I love her website...there are so many fantastic, amazing, wonderful things to find there!
Sunday, September 26, 2010
Pumpkin Chocolate Chip Muffins

These are my favorite pumpkin muffins. I found the recipe at one of my favorite frugal-mom websites, Money Saving Mom. They are probably not the healthiest muffins with two cups of sugar and one and a half cups of oil, but they are absolutely the best pumpkin muffins I've found. They are so moist and fluffy. I like to use Ghirardelli milk chocolate chips in this recipe. It adds something that other chocolate lacks! This huge batch makes 24 regular size muffins and 16 mini muffins when I cook it. What's the best part of making a batch of muffins this big? These muffins freeze amazingly well. I wait for them to cool down, place them on a cookie sheet and throw them in the freezer for about 20 minutes. Once they are frozen solid, toss them in a ziploc bag and keep them for a couple of months in the freezer. C loves to take a couple out of the freezer and let them defrost in his desk at work. He says they are ready to eat by lunchtime, and actually likes them better that way instead of straight out of the oven. Me? I'd eat them in a house, with a mouse, on a boat with a goat...they are that good! Thanks Money Saving Mom for creating such a delicious treat!
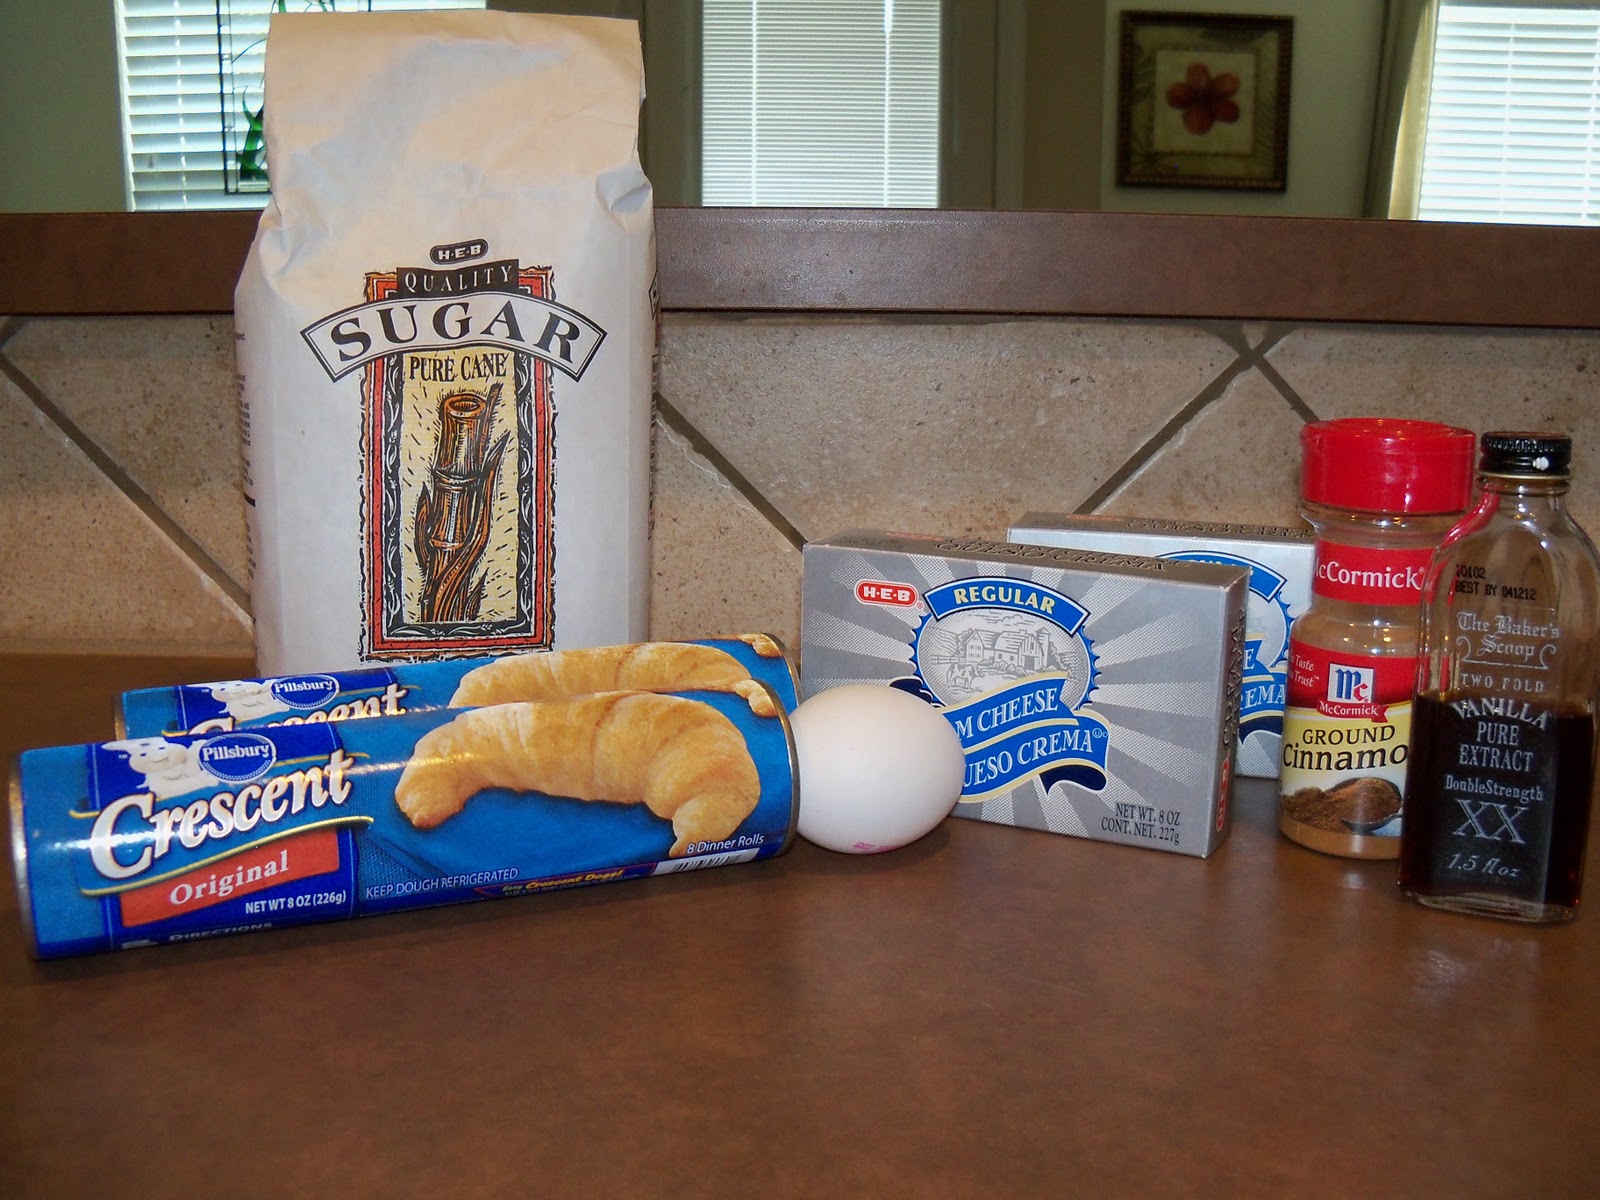
Cream Cheese Surprise
I have a delicious treat for you today! A friend that I used to work with brought this to a company holiday luncheon and I knew I had to get the recipe ASAP. She emailed it to me and I made it twice in the first week! Each time I made it, it lasted for about two days! C loves it when I make this, he could eat the whole pan in one sitting. Don't let him fool you, he could and would! So let's get started!
Here's what you will need!
 Sugar, cinnamon, vanilla extract, one egg, two packages of crescent rolls, and two packages of softened cream cheese...that's all you need! Start by unrolling one package of crescent rolls into a 9x13" glass pan, like so. Try your best to cover the bottom and pinch the seams together.
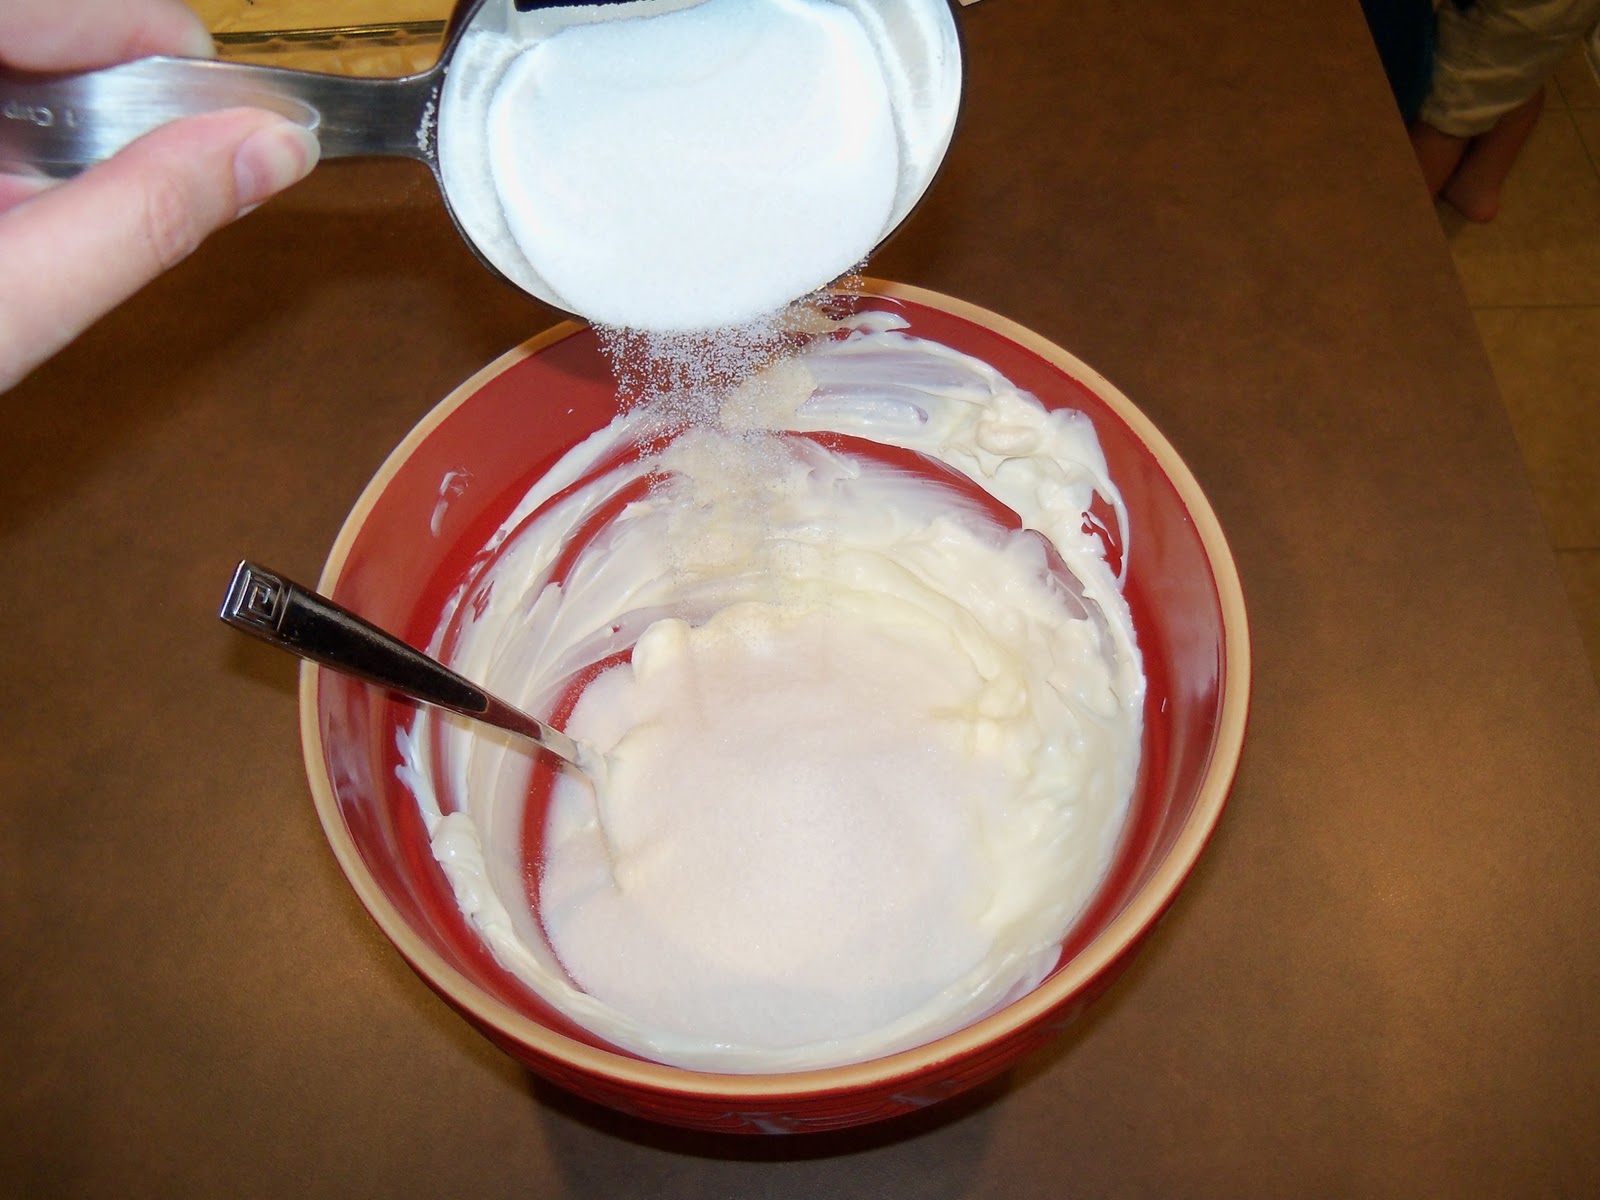
 Next, combine one cup of sugar with the two packages of softened cream cheese.
 Then add one teaspoon of vanilla and one egg yolk. Make sure that you save the egg white, you will need it later!
 Now it should look like this! Yum!
 Spread it evenly over your prepared crescent rolls.
 Then place the second package of crescent rolls over the top. This part is a little tricky to get the whole pan covered. I usually use three sections up and down and then rip apart the fourth section and place it in the holes. It doesn't look that pretty, but it doesn't matter...it won't show too much. Try to pinch the seams together if you can.
 Remember that egg white? This is where you need it. Brush it onto the tops of the crescent rolls, it helps them brown up and get extra yummy!
 Finally, in a small bowl combine 1/4 cup of sugar and 1/2 teaspoon of cinnamon (you can adjust these to your liking, these are my rough estimates). Sprinkle the cinnamon sugar mixture over the egg whites.
 Place in a 350 degree oven for 30 minutes and wait...patiently. For soon you will have this!

Here's what you will need!


You need to store it in the refrigerator if you don't eat it all at once, but come on you know you will! I prefer to eat this cold, C prefers to heat it up for a little bit in the microwave. Either way it's a win-win. It's perfect for breakfast when you have company over. You can make it a day or two ahead, serve it with some fruit and make your guests day. Or you can just eat it all day like we do...it's your call! Hope you enjoy it!
For those who don't care for the pictures and just want the recipe:
1 cup of sugar
2 packages crescent rolls
2 packages cream cheese, softened
1 egg, separated
1 teaspoon of vanilla
1/4 cup of sugar
1/2 teaspoon of cinnamon
Preheat the oven to 350 degrees. Unroll one package of crescent rolls in a 9x13" pan, pinching seams together. Combine softened cream cheese, sugar, vanilla and egg yolk. Save the egg white, you will need it later. Spread mixture evenly over crescent rolls. Unroll second package of crescent rolls over cream cheese mixture, pinch the seams again. Brush egg white over the rolls. Combine 1/4 cup of sugar and 1/2 teaspoon of cinnamon in a small bowl. Sprinkle over the egg whites. Bake for 30 minutes. Enjoy!
What's cooking?
Today I'm baking Pumpkin Chocolate Chip Muffins, Banana Nut Muffins and Cream Cheese Surprise. And yes, we are planning on sharing these and not eating them all ourselves. Although we could, and we wouldn't feel one bit guilty about it! Recipes to come soon...you don't want to miss these!
Oatmeal Scotchies

Lucky you, I have another cookie recipe to share with you. These Nestle Oatmeal Scotchies are fantastic. You can get the recipe here. These aren't your standard cookies...no way! The oatmeal in the cookies gives them such a unique texture and taste. Add to that the butterscotch chips and you can't go wrong. During baking, these cookies get a nice crispness to them and the brown sugar in the recipe crystallizes nicely around the edges. I love making these along with my standard chocolate cookie recipes. You would be surprised how many people don't like chocolate. Wait...did I just say that! Yep, they are a few people in this world who don't like chocolate, none in my family of course! So as an alternative for those people...I make these. Of course, people who like chocolate can eat these too!
Little Man loved these. Every time he saw the container they were stored in, he would point and say cookie. I didn't mind giving him one at a time...the oatmeal adds some nutritional value right? Needless to say, like most batches of cookies in our house, these didn't survive for long!
"Sweet Baby" Carrots
Let me start by explaining the "Sweet Baby" part of the recipe. I always ask Little Man if he is Momma's sweet baby. He nods. I ask him are you Daddy's sweet baby and he nods. Yep, you are our sweet baby and always will be. I thought it fitting to name them "sweet baby" carrots. Granted, he didn't eat any the day I made them...I think he would like them any other day that he wasn't trying to exert his independence by not eating what we serve! :)
Okay, onto the recipe. Here's what you will need:
(1) 12 oz. package baby carrots
1 cup water
1/2 cup packed brown sugar
2 tablespoons butter
1 tablespoon honey
1/4 teaspoon cinammon (more if you want)
Start by combining the baby carrots, water, brown sugar and butter in a medium saucepan. Bring to a boil over high heat, uncovered. Once they come to a boil, turn the heat down to medium and continue to cook for 15-20 minutes. The carrots should be tender and most of the liquid should be evaporated at this point. Just before removing from heat, stir in honey and cinammon. Serve up and enjoy!
These carrots are deliciously sweet! Like a little candied carrot. We couldn't believe Little Man didn't want to even try them, oh well more for us! Hopefully next time he will give them a try. I'm sure the nutritional value of these carrots is the equivalent of a giant cookie, but when you have the chance to make carrots taste super sweet, why pass it up?
Wednesday, September 22, 2010
Well Hello Fall!
Can you believe it? Fall is here! It's time to layer these...


with these!

Aren't you excited? I just love layering jackets over tees and cute tops. Especially when I can throw on a cute scarf to match! I found that great denim jacket and scarf while I was shopping at Ann Taylor Loft last week. That's my all time favorite store and I can't resist a good sale! I just love their style and the sophistication. I feel like it's one store that fits the in between "junior" clothing and "granny" clothing. Don't get me wrong, there's nothing wrong with these styles if that's what you are. However, when you are a 20 or 30 something, you don't want to look younger or older than your age! Sometimes it seems hard to find stylish clothing that is also functional. You know what I mean...clothing that you can chase a small, fast child around in, clothing that you can run errands in and clothing that makes you feel good about yourself all at the same time.
I love to look stylish, but sometimes it's difficult to pull a whole outfit together. That's where Loft comes in, everything I find there is stylish in it's own way. Even their plain t-shirts have a cute flair about them. Dress them up with a cute necklace or cute shoes and you are ready to head out the door. Like this cute shirt and necklace, pair it up with dark denim and ballet flats and you've got yourself a stylish look. If it gets too cool for just the shirt, throw on a cute cardigan or jacket and it gets you through fall. I love this fancy sweater and necklace, although the cute flower on the shoulder probably wouldn't last long if Little Man got a hold of it!
I'm so glad the fall weather is here. I'm planning a closet switch up for later in the week. Bye bye summer time, hello fall! What's your favorite fall outfit?
Sunday, September 19, 2010
Chocolate Peanut Butter Cookies

So if you haven't noticed we have a "sweets" problem in our house. I love trying out new recipes and I've always got a willing taste tester, sometimes two. I cranked out quite a few dozen cookies last weekend for our church's service project and managed to end up with a few to munch on. Our favorite recipe of the weekend was this one that I had tucked away from an old HEB advertisement. It's meant to have mint chocolate chips, but I substituted Peanut Butter chips...a mighty fine substitution if I don't say so myself.
Double Chocolate Cookies
Recipe from HEB Ad from sometime in the 2000's :)
1 cup flour
1/2 cup cocoa powder
1/2 tsp. baking soda
1/4 tsp. salt
1 cup sugar
1 egg
1 tsp. vanilla extract
1 2/3 cup (10 oz.) chips (peanut butter, mint, chocolate, whatever you like)
2/3 cup butter, softened
Heat oven to 350 degrees. Sift the flour, cocoa powder, baking soda and salt together in a large bowl and set aside. Beat the butter and sugar in a large bowl with an electric mixer on high until creamy. Add the egg and vanilla and continue to mix on high for one minute more. Using the mixer, gradually add the flour-cocoa mixture, 1/4 cup at a time, to the butter mixture until a smooth batter is formed. Stir in the chips using a spoon. Drop the cookie dough, 1 rounded teaspoon at a time, 2 inches apart on an ungreased cookie sheet. Bake cookies 8-9 minutes. Do not overbake. Cool slightly; remove from cookie sheet and place on wire rack to cool completely.
Makes about 2 1/2 dozen
These cookies turn out so moist and chewy! I love the chocolate flavor, and mixing it with the peanut butter chips is like cookie perfection! You'll want to finish the whole batch in the first day, luckily I bagged up the give away cookies before the cookie monsters could get into them!
And as a very icky, very stupid side note....please, please, please crack your eggs in a separate bowl instead of directly into your batter. I know this rule, my momma told me that every time I baked anything and yet I fail to heed her advice. For the second time in my life I came across a "bad" egg that ruined a perfectly good batch of cookies! I think I may have finally learned my lesson! At least I hope!
Mozzapico Burgers

C made these delicious burgers last weekend. We saw something similar at the Cooking Demonstration at our grocery store and decided to try it out. The ingredients aren't what you would find in your typical burger, this one is jazzed up!
Here's what you will need:
1 pound ground beef
1 Tablespoon Spice Rub*
1/2 cup Pico de Gallo*
1 egg
1 fresh mozzarella log*
Buns, condiments, fresh veggies for topping
Ingredient Notes:
*We used Stubb's spice rub
*HEB carries their Ready, Fresh, Go Pico de Gallo that is quite tasty in the produce section. If you can't find ready made at your grocery store there is a quick and easy recipe for it here.
*Slice the mozzarella log into thick slices, they will be inside the burger...mmm tasty!
First things first...
Combine the beef, pico, rub, and egg together. Form into four patties surrounding the mozzarella slices. Grill for 5 minutes per side or until desired doneness (is that a word...my doneness is WELL done just in case you cared)! Serve up on toasty, buttered buns with all the fixings and you have yourself one tasty burger!
From the very first bite, I was hooked. I have to say that I'm usually not a burger girl, but these might have converted me. The egg in the burger gives them a super tender, juicy flavor. It was definitely the juiciest burger I've ever had. The pico in the burger gave it a nice crunch, not what you would expect from your average burger. And the mozzarella...oh the mozzarella! It was like an inside out burger, with the cheese melted in the burger! I don't know what else to say about these burgers, other than we will be making these often. We were trying to figure out what other ingredients we could experiment with now that we've found the secret to a juicy burger. Any suggestions?
Thursday, September 16, 2010
Chocolate Dulce de Leche Cupcakes
Chocolate+Caramel=Delicious

That's really all you need to know about these cupcakes. I used this recipe to create these yummy cupcakes last week, and let me tell you they didn't last long! I shared them with our small group and they went over quite well! :)
The chocolate base of the cupcake was so moist and crumbly. There was a slight hint of the dulce de leche in each bite, which worked out much better than my caramel candy experiment that you can read about here. The frosting was super sweet (at least to me)...I will try to adjust the ingredients the next time I make it. I'm thinking that if I leave out a spoonful of the dulce de leche it will help...I used the maximum that she called for in the recipe.
As C says, "Each cupcake that I try gets better and better!" That's really the only review you need. He's basically a cupcake connoisseur, so if he likes them so will you! :)
I knew that these cupcakes needed to be transported, so I broke in my new cupcake carousel! It's this gigantic container in the shape of a cupcake that holds 24 standard size cupcakes. Here it is stacked up with cupcakes.

You can see that my cupcakes weren't "standard" by their standards. I had to cram them in each layer to actually fit 8 per tier. It's probably because these cupcakes are so puffy at the top! Either way, I love it and can't wait to use it more! I found mine at HEB, but they are already gone. I did find it online here if you want to check it out! It also comes in a pretty hot pink color.
Monday, September 13, 2010
Beginning Digital Scrapbooking from a Beginner!
I have a confession to make about Photoshop. C bought Photoshop Elements 8 for me as a Christmas gift. I was so excited to get it out of the box and install it. As soon as I opened the program for the first time, I was completely overwhelmed by it's capabilities! There were so many tools and effects that I didn't even know where to begin...it doesn't even come with a manual. So I opened a new file and tried to get right to work creating my first digital scrapbook layout. I worked on it for about 20 minutes and gave up! I had no idea what I was doing and was so disappointed. I had seen the extravagant layouts with beautiful layers and perfectly placed pictures...I just knew I could do it! But it turns out I couldn't! So I gave up for quite a few months. I'm sad to say that I didn't even open Photoshop for a good three or four months! The little Photoshop icon on my computer stared at me every time I turned on the computer...taunting me even. And then my digital scrapbooking world completely turned upside down.
One afternoon I was browsing the Shabby Princes blog and stumbled upon a free template. I had no idea what it was or how to use it, I just knew it looked cute and I wanted to figure it out and quickly! At the bottom of the post, it linked to a tutorial on how to use the free template. Please take the time to look at this, you will be amazed at how simple and easy it really is! So I downloaded it and got right to work. I opened it in Photoshop, opened up one of my free digital kits that I picked up here and got right to work. I made this layout in about 20 minutes.

The most time consuming was picking out the digital kit to use. I used the Happy Go Lucky kit from the Shabby Princess website...did I mention that these are FREE! There are so many digital freebies out there, I have yet to pay for any download! Most of the digital kits come with a few papers, a few embellishments (ribbons, buttons, clips, etc.) and sometimes an alphabet...everything you need to create a wonderful layout! Look at the wonderful layering and shadows on the layout, that's all built into the template. All you have to do is open your digital papers and elements (buttons, ribbons, etc.) and the photos from your computer. Basically drag and drop and your layout is done! I love it...this is exactly what I was looking for! I hope to eventually have enough knowledge to create my own templates and "from scratch" layouts, but for now I am perfectly happy with others doing the hard part! :)
Here's another layout that I worked on recently. I also used the Happy Go Lucky kit for this one, it's one of my favorites.

So there you have it, my Photoshop confession. Wow, I feel so much better getting that off my chest! Now what are you waiting for, check out those sites and get to work. I would love to see what you create!
Friday, September 10, 2010
Meatloaf Muffins with BBQ Sauce
I know what you are thinking...meatloaf muffins? Gross! I know it sounds weird, but you have to try them. I'm talking about this recipe. Go, check it out...I'll wait until you come back!
Okay, you're back! I love all things Rachael Ray. I try to make a few of her 30 minute meal recipes at least a few times a month. Whenever I ask C what he wants for dinner the next week, this one is high on his rotation. We make it a lot! Let me start by saying that I am not a meat"loaf" fan, I can't stand the look of the sliced meatloaf strategically placed on a plate. I never have been, probably never will be! But these little guys are so stinking cute, and cooking them in a muffin pan allows for extra crispiness all the way around, similar to the top of the meat"loaf."
When I make the recipe, a usually only use 1 pound of meat, 1/2 an onion, and 1/2 a bell pepper. We still end up with 12 meatloaf muffins which is enough for the three of us to have dinner, C to have leftovers for work and Little Man and I to split a few for lunch the next day. It says a lot about this recipe that I will eat it the next day. I'm kind of a leftover snob. Plainly put, I don't like them. Especially leftovers that have any kind of meat in them. Luckily, C doesn't mind taking my home cooking to work the next day for lunch. But these guys, I could eat over and over! There's just something about them!
The recipe also calls for BBQ sauce. I have only ONE brand of BBQ sauce that I will buy, and that's STUBBS brand. That's right the Stubb's based in Austin, Texas. You can find it in most grocery stores, but if you can't you can buy it online here. Trust me on this, you need this sauce in your life! It's the only one you need! As a side note, I have very high standards for my BBQ. There are only four place that I have found that I truly like. Two of them are in my hometown, one of them is owned by our friends parents, and the other one is Stubb's. I'm always on the hunt for good BBQ near by and have yet to find one that doesn't require me to be in the car for at least 45 minutes! Stubb's also sells marinades and rubs, both of which we love. C used them to smoke a chicken recently and it was fantastic. (And no, I'm not being paid by Stubb's to promote their products) Enough about the sauce!
The recipe also has a link for fancy green beans and potatoes. I usually crack open a can of green beans and whip up some instant mashed potatoes for us instead of going through all that effort. We are fine with canned vegetables and instant potatoes, but if you aren't then by all means make RR's.
Verdict: Obviously we love these! When something makes it into our dinner rotation, it has to meet strict standards. This one has it all...it's quick (making them into muffins cuts the time down to 20 or so minutes), it's tasty (see above) and all three of us will eat it. It's not easy to find good recipes that will satisfy the picky appetite of a one year old! Go, make these tonight!
One last word of warning, spray the heck out of your muffin tin. Spray it many times...you will regret it if you don't. The clean up from this dinner is atrocious. I usually soak the muffin pan overnight to make my life easier. I've thought of purchasing disposable muffin tins everytime I make this dinner, but always forget when I'm grocery shopping. Don't let that deter you from trying the recipe though, it's totally worth the effort! Enjoy!
Wednesday, September 8, 2010
One of my favorites...
I love, love, love checking out Kevin and Amanda's website. I find so many great things there, things that have helped me turn this blog from drag to fab. Love the blog post fonts? That's Amanda's font Pea ScrapBrandy. You can download it for free, along with so many others. See my header up there? I created it in photoshop with the free digital scrapbooking kit "Spring" from the website. I could spend hours scrolling through the posts and finding inspiration. You should too!
Vanilla Cupcakes with Chocolate Cream Cheese Frosting

Up next on the cupcake list: Vanilla Cupcakes with Chocolate Cream Cheese Frosting. I scoured the web for the "best" vanilla cupcake recipe I could find. I read a lot about Magnolia Bakery's Vanilla Cupcakes. They look incredible, but I read mixed reviews. I finally decided to try this recipe. This recipe called for yogurt, and I wasn't sure how that would turn out. They took much longer to bake then the suggested 15-20 minutes...I think it was more like 25 minutes. Once cooled, I frosted them with this Chocolate Cream Cheese frosting. Scroll all the way to the bottom for the recipe. I used my standard Nestle Cocoa Powder to create the frosting, I don't buy into the Premium Cocoa Powder hype! :) Chocolate is chocolate and that's fine with me!

Verdict: The yogurt gave the cupcakes a very dense texture. They didn't puff up like you would expect a cupcake to, which could have contributed to the longer bake time. They weren't super sweet, and we could actually eat more than one at a time. The frosting had a very distinct cream cheese flavor. It was very easy to pipe and had a nice smooth, creamy texture. I used my Wilton Jumbo 1M tip for the piping. They turned out much cuter than the previous batch. We kept the cupcakes stored in the refrigerator so that the cream cheese frosting would stay cold. C said that he preferred the cupcakes cold! Even Little Man had a whole cupcake, sans frosting. His tummy isn't sold on chocolate just yet, so we try to avoid it when we can!
If you are looking for a good go-to cupcake that isn't super sweet, this may be your cupcake!
Chocolate Caramel Cupcakes with Peanut Butter Buttercream Frosting
 Wow...you must make these! They were so rich, fluffy and delicious. I used this recipe for the base of the cupcakes. I altered it some by placing a caramel candy into each cupcake before baking. When these came out of the oven, the smell was like walking into your very own bakery.
For the frosting I chose a peanut butter buttercream. I searched for a recipe and finally ended up combining a couple.
Here's what I did:
2 cups confectioner’s sugar
1/2 cup unsalted butter at room temperature
1/2 creamy peanut butter
2 Tbs milk
With an electric mixer, beat together sugar, and butter until creamy. Add peanut butter, beating well. Add milk and beat until smooth and creamy. The icing will seem very stiff, but is quite easy to pipe.
Verdict: The cupcakes were moist and crumbly. They were so decadent, I could only eat one at a time (but we did finish off the dozen during the weekend...did I mention that we have sweet teeth?). The melted caramel in the center left a gooey layer of sweet, sticky goodness near the bottom of the cupcake. Next time, I'll add more caramel to each one. Have you seen the caramel bits in the chocolate chip aisle...next time I'll experiment with them. The frosting was very peanut buttery...if that's a word. If you like peanut butter, this is the recipe for you. Next time I might cut down on the peanut butter, though my better half might not agree! He's a fan! We even let Little Man try them, and he was more than happy to eat more!
As a final note, I am working on my piping skills, obviously. It's evident that I didn't use the right tip and promptly went out and bought the Wilton Jumbo 1M tip. Much better! The next cupcake experiment turned out better! I also have very limited food photography skills, though I am trying to get better. I've been reading blog after blog on just about every aspect of food photography, cupcake recipes, blog design and who knows what else! Bear with me as I start this crazy ride!
Tuesday, September 7, 2010
I'm going to try this out!
So, I haven't done anything like this before...but here it goes! I'll share my favorite things with you in hopes that they will soon become your favorite. I have a passion for cooking and baking and want to share that with others. I've become a huge fan of all things cupcakes...they are so cute and delicious. Who doesn't love a personal size cake with decadent frosting? Food Network is a standard in our home, specifically Cupcake Wars and Ace of Cakes. I will never have the artistic abilities to create a Charm City-esque cake, but I am willing to try my hand at cupcakes.
I have two willing taste testers at home...my wonderful, supportive husband of 5 years ("C") and my sweet little boy ("Little Man")! They love it when I test out cupcakes and any new recipe really.
I'll also throw in a little fashion here and there. I love to follow the seasonal trends, although you might not be able to tell by the way I dress. This heat isn't conducive to cute outfits, mainly shorts and tank tops. I'll share some of my favorite finds from my shopping adventures. I love to window shop and try to piece together outfits from what I already own. Maybe this will inspire ME to be a little more fashionable while I'm out and about.
I love, love, love to scrapbook. I'm a traditional album kind of gal, but recently I've started a little digital scrapbooking. I love scouring the web for digital freebies and templates and will share all of the cute sites that I find. You won't be disappointed!
Last, but certainly not least, I hope to share some great photography sites with y'all! I am not even close to an intermediate level photographer, but I have found some excellent information on how to move out of the "point and click" mode of taking pictures!
I hope that you find something you love on this blog, and if you do leave me a comment. I would love to hear what you like and dislike about the site, what recipes you would like to see, or just to hear that you love me! ok...j/k about that last one! :)
Subscribe to:
Posts (Atom)