Friday, November 26, 2010

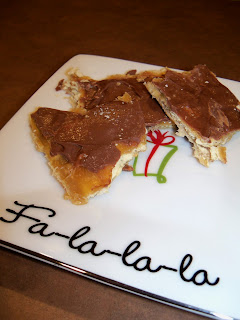
Toffee - Week 9 of 12 Weeks of Christmas Cookies!

 I hope that each and every one of you had a fantastic Thanksgiving.  I know we did...I'm still feeling full from all of the delicious food we ate.  I'm finally getting around to my cookie post for the day.  We've been having so much fun decorating for Christmas that I haven't gotten around to it...until now.  I made toffee this week to share for our Thanksgiving dinner, but we had so much food that we barely ate it!  :)  It's super easy and fun to make.  The recipe says to use foil, but next time I would probably try something different.  The toffee stuck to the foil pretty bad and I had to use some strong forces to get it off!  Maybe parchment paper or a silicone mat would work better. 
Toffee
adapted from: Cooks
40 saltine crackers
1 c. butter
1 c. brown sugar
1 c. milk chocolate chips
Arrange 40 saltine crackers on foil on a jelly roll pan. Melt butter and brown sugar in pan and boil 3 minutes. Pour over crackers. Bake for 5 minutes in preheated oven at 325 degrees. Pour chocolate chips over and let stand 5 minutes to melt. Spread around with knife. Place in refrigerator until hard. Break up into bite-size pieces. Yum!

This would look great on any holiday cookie tray!  I can't wait to see what every one else is baking this week for the 12 Weeks of Christmas Cookies!  Christmas Season has officially begun - time to pack up the pumpkins and pull out the trees, angels, Santa's, nativities, and stockings!  Our house is starting to feel like Christmas!
Week 9 Twelve Weeks of Christmas:

Wednesday, November 24, 2010

The Cutest Turkey Shirt

I've been wanting to make Little Man a turkey shirt to wear on Thursday.  Of course, I waited until this week to actually put it into action.  I searched the entire town to find a plain white short sleeve t-shirt in his size with no luck.  I finally found a long sleeve white shirt at Target today and decided that I had to use it.  I had already drawn my own turkey template, but then I happened upon this one over at The Cottage Home.  I decided to use it instead of my own.  The shirt turned out super cute if I don't say so myself.  I found some fabric scraps at the store that semi-coordinated and got to work.  Don't forget to make sure you have Wonder Under in your craft stash before you get to work.  I searched and searched this afternoon in my craft closet and couldn't for the life of me find it - so I had to make another trip to Hobby Lobby!  That's not always a bad thing...

Here's the super cute shirt for Thursday.  I still need to give the turkey eyes and a beak, but it's basically finished!  I'm so happy with it!


Monday, November 22, 2010

Thanksgiving Day Menu

Thanksgiving week is here!  Are you ready?  I think I'm ready, but we will see when Thursday rolls around!  We are having a little get together, 6 adults and Little Man so we are keeping it low key this year.  I'm sure most of you have your menus finalized, but I just wanted to share mine in case you are still looking for that last minute side dish!  Here's the plan:

Turkey and Cornbread Dressing
My aunt has offered to cook the turkey and dressing for us.  I'm so very thankful for this, because I've never actually cooked a turkey before.  I can't believe that I am admitting that to you...

Hashbrown Casserole
Cheesy, potatoey, ooey-gooey goodness.  You need this crunchy cracker topped goodness in your life!

Cheesy Bacon Green Bean Casserole Pot Pie
The name says it all: Cheese+Bacon+Green Beans+Puff Pastry=Deliciousness.  I might not need the rest of the sides once I start eating this!

Sweet Potatoes
My mom's recipe which I have yet to perfect.  It contains sweet potatoes (obviously), some brown sugar, a touch of honey, a little Karo syrup and lots of marshmallows toasted on top!  It's like eating candy!  Delicious.Sweet.Potato.Candy!  Enough said!

Rolls, Gravy, Cranberry Sauce
The essentials.  Can't have Thanksgiving Dinner without these!  I'm using a little help from the store on these items....shhh don't tell anyone!

Desserts - yes please!
Pumpkin Praline Pie - yep it's pumpkin pie on the top with a crunchy pecan praline layer on the bottom!  Courtesy of my mother-in-law!
Pumpkin Bread  - I haven't made this one myself, but I have several friends who have and it is delicious!  It makes a ton of bread though, be prepared to gift some of it off to your guests when they leave! :)
Toffee - I'm thinking of substituting Graham Crackers for the saltines in this one.  I'll let you know how it goes.  This might end up being Christmas Cookie of the week! :) 

After stuffing our faces with such good food, I don't know if I'll be able to waddle my way to the laptop for Friday's cookie post!  I hope that you and your family have a blessed Thanksgiving and enjoy spending time with each other.  Remember the spirit of this holiday, be thankful for all that we have been blessed with!  I'm blessed beyond measure and I hope that you feel the same too!  Happy Thanksgiving!

Thursday, November 18, 2010

Pecan Pie Cookies - Week 8 of 12 Weeks of Cookies!

I had a request from C this week for some type of Pecan Cookies.  After browsing through a few recipes, I finally settled on this Pecan Pie Cookie recipe from the Land O'Lakes website.  I have to admit that I'm not the biggest pecan pie person.  I prefer pumpkin pie over pecan pie any day of the week, especially Thanksgiving.  Nevertheless, I thought it might be good for me to try pecan pie in a cookie form.  They aren't my favorite cookie by any means (I know, who bakes a cookie they don't like and then blogs about it?), but C said that they were really good.  I guess that I'm just biased when it comes to pecans.  For some reason I don't want them in my baked goods!  Call me crazy! :)  Enough of that, on to the recipe:

Pecan Pie Cookies
From: Land 'O Lakes
Ingredients:
Cookie

1 cup firmly packed brown sugar
3/4 cup butter, softened
1 egg
1 teaspoon vanilla
2 cups all-purpose flour
1 teaspoon baking powder
Filling
1 cup chopped pecans
1/2 cup firmly packed brown sugar
1/4 cup whipping cream
1 teaspoon vanilla
Directions:  Heat oven to 350°F. Combine all cookie ingredients except flour and baking powder in large bowl. Beat at medium speed until creamy. Reduce speed to low; add flour and baking powder. Beat until well mixed.  Shape dough into 1 1/4-inch balls. Place 2 inches apart onto ungreased cookie sheets. Make indentation in each cookie with thumb; rotate thumb to hollow out slightly.  Combine all filling ingredients in small bowl; fill each cookie with 1 rounded teaspoon filling. Bake for 8 to 12 minutes or until lightly browned. Cool 1 minute; remove from cookie sheets.

So, moral of the cookie story is:  If you like pecan pie or pecans in general, you will like these cookies.  If you are like me and prefer pecans to stay away from your cookies, then maybe you want to avoid making these!  :)  I find it hard to write much about a cookie that I'm not fond of, I feel like I am leading you guys astray!  You come to this blog to find things that I love, so it seems a little weird to me to be doing this.  It makes me feel better that C says they are good.  At least the cookie has his support!  He wouldn't lie to me about the way something tastes.   I've heard the good, the bad and the ugly about some of my recipes, so trust him!
Alright, I'm off to bake something with chocolate in it!  That makes my tummy happy!  Don't forget to check out the other cookie posts that are part of the 12 Weeks of Christmas Cookies!  Happy Baking!
Week 8 Twelve Weeks of Christmas:

Wednesday, November 17, 2010

Hashbrown Casserole

The holidays are here.  Can you believe that Thanksgiving is next week?  We are having a small get together at our house and I'm slowly preparing for it...I may post my menu later this week.  A staple in my house for any holiday or get together is Hashbrown Casserole.  My sister-in-law always makes this and now I do too.  It's so easy to throw together and is the perfect pairing for a turkey, a ham or even fried chicken.  Once you make this, it's going to become a staple in your house too!

Hashbrown Casserole

1 cup sour cream
1 can cream of chicken
1 package grated cheddar cheese (8-10 ounces)
1 teaspoon salt
2 pounds frozen hashbrowns (you can use the shredded or cubed, I prefer the cubed)
1 stack of Ritz crackers
1 stick of butter (melted)

Combine the sour cream, cream of chicken, cheese and salt in a large bowl.  Add in the hashbrowns and stir to combine.  Pour into a 9x13 casserole dish and top with crushed Ritz crackers.  Pour the melted butter evenly over the crackers.  Bake at 350 degrees for about 1 hour.  Enjoy!

See...so easy!  The flavor combination of the crispy Ritz crackers, the ooey-gooey cheese, and the soft potatoes is fantastic.  And your kitchen will smell so amazing while this is cooking.  I think my favorite part of this whole dish is the deliciously toasted crackers on top.  They are golden and perfect when you pull the potatoes out of the oven, kind of like this:
This dish travels well also.  You can make it a day ahead and then just reheat when you arrive at your destination.  If you only make one dish next week, make this one.  You'll be glad you did!

Tuesday, November 16, 2010

The Perfect Necklace...

I spent most all of Friday at the Nutcracker Market!  I love, love, love shopping at the Market and always find the cutest things there.  If you haven't been, you must go!  It's usually the middle of November at Reliant Arena in Houston.  Make the trip, even if you live across the country...it's worth it!  Call me and I'll go with you!  You can't imagine how big this thing is until you have actually trekked for hours and hours through it!  Be prepared to wait patiently to get in, to park, to pay for your items at each vendor and to eat lunch.  Patience is a MUST at this thing, and it's something I sometimes have very little of!  Anyway, I found so many great gifts and a few choice pieces for myself.  Like this little number that I couldn't resist...
isn't that the cutest necklace?  I've never seen anything like it and I knew that if I didn't get it then, I would never find it again!  I found it at A Rosy Outlook's booth.  I searched their website for it, but didn't see it.  I'm sure if you really, really wanted it you could contact them and they would find a way to get you one!  They have so many cute things there, I found quite a bit that I just had to have!  Here's a close up view of the charm:

I still have my eyes set on this sweet Lisa Leonard "Through My Lens" necklace.  I'm hoping Santa drops one by my house this Christmas! :)  I'm usually a one necklace kind of gal, the one C gave me for Christmas while we were dating.  It's a James Avery silver and gold heart on a dainty little chain.  I love it, I wear it every day, every where!  99% of the time that you see me, I'll have that one on!  Although, I'm starting to branch out a little and wear a different one here and there.  It's not that I don't have necklaces to choose from, trust me I have a ton.  I just like to stick with my favorite.  When I'm not wearing the other ones, I like to keep them on display.  As soon as I saw this metal cross at a decorator store, I knew it would be perfect for hanging necklaces and bracelets.
You can probably find something similar to it at Hobby Lobby or Michael's.  I just love the way it looks on my dresser and love to look at all of my necklaces, even though I don't always wear them!  What about you guys, do you stick with the same necklace every day or do you mix it up a little?

Friday, November 12, 2010

Andes Mint Cake Balls - Week 7 of 12 Weeks of Cookies!


Oh.my.goodness!  I am in love with this chocolate and mint delight!  I'm surprised there were any left to take a photo of after I sampled the first few.  OK, the first six!  Lucky for you guys this recipe makes a lot, so there's enough for you to eat and for you to share with friends (if you want, I won't tell if you don't).  I love making cake balls.  They remind me of little petit fours without all the work.  Don't get me wrong, you will have to do a little work but not much!  It's a delicious little cake covered in chocolate, how could that go wrong?  It can't!  So let's get to the recipe!
Andes Mint Cake Balls
Method: Bakerella
Chocolate and Mint Combo - came to me at 3:00 in the morning, I'm sure!

Ingredients:
1 package Chocolate Cake Mix (your favorite)
1 tub of chocolate frosting
2 packages of Andes Creme de Menthe Baking Chips

Directions:
Cook cake according to package directions in a 13x9 pan.  Let cool completely (don't try to skip ahead, you'll regret the mess).  Crumble cake into a large bowl.  Stir in one tub of frosting...yes the whole thing.  Some people only use 1/2 a tub, but the secret to moist cake balls is the amount of frosting!  Make sure the mixture is thoroughly combined, don't be afraid to get your hands dirty!  Using a small cookie scoop, scoop out cake balls onto a parchment paper lined tray that will fit in your freezer.  You will probably need 2 or 3.  Once complete, place the cake balls in your freezer for at least an hour, longer if you have the time.  Remove a tray from the freezer and working in small batches (think 1/3 cup) melt the Andes chips in a microwave safe bowl for 20-30 seconds.  Stir to create a nice smooth chocolate, then begin by dipping one cake ball at a time into the chocolate.  Cover completely, then remove with a spoon.  Place on parchment paper to cool.  Keep working in small batches until you have 5 to 6 dozen tasty treats!  I like to store these in the refrigerator, there's something about a cake ball being cold!  It just seems right!

That's it!  Easy as...well cake balls of course!  It will seem a little time consuming having to wait between each step, but it will be well worth the wait.  There's just enough mint in each of these to balance out the delicious chocolate goodness!  One bite and you will be hooked.  And remember it's just a method so you can choose whatever cake flavor and frosting flavor you like!  The cake ball world is at your fingertips my friends!  I'm off to polish off the other 5 dozen now, I might need professional help!

I have to add a shameless plug here: Did you check out my Giveaway Post?  You don't want to miss it!

Don't forget to hop on over to the other baker's blogs this week!  It's hard to believe that we are 7 weeks into this project.  That means Christmas is just around the corner.
Week 7 Twelve Weeks of Christmas:

Sunday, November 7, 2010

Taco Soup - Paula Deen Style!

Another bowl of soup?  Yep, with the cooler fall weather I'm trying to get in all the soup I can before the 90 degree weather creeps up on us again!  I love this Taco Soup recipe.  My sister-in-law introduced me to it during the holidays last year and I couldn't stop making it.  I've been patiently waiting for the temperature to drop so that we could have Taco Soup for dinner again!  I love this recipe!  It is so simple and feeds a large group of people...very hungry people!  The recipe serving suggestion is 12-16.  I don't know about you guys,  but I rarely feed that many people at once.  That's the best part about this recipe though, it makes enough to freeze at least two nights worth of dinner for us!  This soup freezes so well, you can't even tell you didn't throw it together that day!  After last night's dinner, I have two large containers in the freezer and two in the refrigerator for lunch tomorrow.
I love meals that serve double duty for those nights when I know I won't have time to cook!  I freeze my soups in large round food storage containers and dump the frozen circle of soup into my crock pot.  Turn it on low and walk away until dinner time, no mess, just dinner!  I love it!
This recipe uses a lot of cans of beans, tomatoes and other assorted goodies!  I think I counted 11 cans that I opened and dumped into the pot.  That's the beauty of this recipe, while you are browning 2 pounds of ground beef and an onion, you are opening cans and dumping them into a pot!  Easy, easy!
We love to put corn chips on the bottom of the bowl and then top with the soup and lots of grated cheese.  This soup is filling and comforting, it's exactly what you need when the weather outside is cooling down!  I love all of the beans and tomatoes...Paula Deen has done Taco Soup the right way!  Here's the recipe:
Taco Soup
from: Paula Deen

2 pounds ground beef
2 cups diced onions
2 (15 1/2-ounce) cans pinto beans
 1/2-ounce) can pink kidney beans
1 (15 1/4-ounce) can whole kernel corn, drained
1 (14 1/2-ounce) can Mexican-style stewed tomatoes
1 (14 1/2-ounce) can diced tomatoes
1 (14 1/2-ounce) can tomatoes with chiles
2 (4 1/2-ounce) cans diced green chilies
1 (4.6-ounce) can black olives, drained and sliced, optional
1/2 cup green olives, sliced, optional
1 (1 1/4-ounce) package taco seasoning mix
1 (1-ounce) package ranch salad dressing mix
Corn chips, for serving
Sour Cream, for garnish
Grated cheese, for garnish
Chopped green onions, for garnish 
Pickled jalapenos, for garnish

Brown the ground beef and onions in a large skillet; drain the excess fat, then transfer the been and onions to a large slow cooker or a stockpot.  Add the beans, corn, tomatoes, green chilies, black olives, green olives, taco seasoning, and ranch dressing mix.  Cook in a slow cooker on low for 6-8 hours or simmer over low heat for about 1 hour in a pot on the stove.  To serve, place a few corn chips in each bowl and ladle soup over them.  Top with sour cream, cheese, green onions and jalapenos!  Enjoy! 

Friday, November 5, 2010

Hot Chocolate Mocha Cookies - Week 6 of 12 Weeks of Cookies!

Wow...Friday snuck up on me this week!  It's time for a cookie post already...oh my!  Last night I got to work in my kitchen trying to whip up a batch of chocolate mocha cookies.  Getting all of the ingredients out, I realized that I am out of coffee.  We are not coffee drinkers in our house, I love the smell, not the taste.  I used to have those little Folgers packets that look like tea bags, but I ran out.  (I'm sure those taste icky to people who actually drink coffee, but for cookies they work).  Anyway, I realized that I was out and had to figure out a solution.  I searched my pantry and spice cabinet and came across my Ghirardelli Chocolate Mocha Hot Chocolate, and that's what I used!  Here's the lineup:
 Start by melting 1/2 stick of butter.  Mix in one box of devil's food cake mix, one egg, and 1/3 cup of brewed hot chocolate.  Once combined, mix in one cup of milk chocolate chips and 1/4 cup of white chips.  Using a cookie scoop drop onto your cookie sheet like so:
Yum!  Bake for 10-12 minutes at 350 degrees or until they are soft in the center and crispier on the edges.  Let them cool for a few minutes on the cookie sheet then transfer to a wire rack to finish cooling.  Serve them up with a tall glass of milk, don't resist when you want to help yourself to more!
These cookies are so soft and chewy!  I just love the texture of cake mix cookies!  Adding the hot chocolate gave these cookies a nice taste, just a little hint of mocha.  Not too overpowering, just a taste!  I love a cookie with lots of chocolate chips in it, and the mixture of white and milk chocolate is oh so yummy!  You and your guests will love these.  Make a batch ahead of time and you can store them in the freezer.  Pull them out the day before you need them and let them thaw on the counter...it couldn't be simpler.  I don't know about you guys, but I'm always looking for time savers, especially around the holidays!  I can't believe Christmas is sneaking up so fast!  Are you ready for the holidays?  Have you done your shopping and made you holiday menus?

Don't forget to check out the other cookie bakers blogs this week.  I'm still making a list of all those fantastic cookies I want to bake and give away!
Week 6 Twelve Weeks of Christmas:

Wednesday, November 3, 2010

PW's Corn Chowder with Chilies

I have to start out by saying that we don't eat a lot of soups at our house.  I'm not quite sure why, but we just don't.  This is the second one I have made in the last few weeks, remember the Baked Potato Soup.  I think we still both have this notion that it's not very filling, but once I saw this recipe for Corn Chowder over at the Pioneer Woman's website I decided to give it a shot!
Oh man, it was so simple!  The hardest part was cutting up the frozen bacon! :)  That's about the point I realized that my knives could use a serious sharpening!  Have I done it yet, no...maybe I can talk C into it this weekend.  Something about sharpening knives makes me nervous!  Anyway, after the bacon debacle it was basically opening cans and cartons and waiting patiently!  I opted to use a bag of frozen corn kernels rather than fresh corn, I'm all about simplicity people.  If you haven't figured that out yet, you aren't really reading my blog!  The smell of the chilies cooking is something else.  I opted to use a couple of teaspoons of Mrs. Dash Southwest Chipotle Seasoning rather than the Chipotle in Adobo from a can.  I had a bad experience with it last year, and I haven't gotten over it!  I was so upset about the oh so spicy, inedible dinner that I still haven't forgiven the Chipotle in Adobo!  Maybe one day we can be friends again, but not anytime soon!
I let the soup sit for a while after I added the corn meal, but I never got it to thicken up like the Pioneer Woman's, but let's face it...I'm no Pioneer Woman.  I am me and that's enough!  Even though it never really thickened up, it still tasted so refreshingly delicious.  As C said, who thought corn and chilies in a soup would taste so good!
Corn Chowder with Chilies
Adapted from: the Pioneer Woman

2 slices Bacon, Cut Into 1/2-inch Pieces (or Smaller)
2 Tablespoons Butter
½ Onion, Diced
1 bag frozen corn (need about 4 cups)
2 teaspoons Mrs. Dash Southwest Chipotle seasoning
4-ounce Can Diced Green Chilies
32 ounces Low Sodium Chicken Broth
1-½ cup Heavy Whipping Cream
½ teaspoons Salt (more To Taste)
3 Tablespoons Corn Meal OR Masa
¼ cups Water
"(Carefully) slice the corn kernels off the cob. Set aside.
Add bacon pieces to a pot or dutch oven over medium heat. Cook for a couple of minutes. Throw in diced onion and stir, cooking the onion for 3 to 4 minutes. Add butter and melt. Add corn. Stir and cook for one minute. Add both kinds of chilies and stir.
Pour in chicken broth and cream. Add salt. Stir and bring to a boil. Reduce heat to low.
Combine cornmeal (or masa) with water. Stir to combine, then pour into the chowder. Cover and cook for 15 minutes over low heat. If chowder needs more thickening, add another tablespoon of cornmeal mixed with water. Cook for another ten minutes.
Serve with crusty sourdough bread or in a bread bowl. Absolutely yummy!"

LinkWithin

Related Posts with Thumbnails